Support site for do it your selfers and users looking for solutions to problems

  • Tag Archives Outlook
  • Featured ImageOffice 2013 Office 365 Activate Activation Error Code 0x80070005

    Outlook 2013 or Office 365 activation error 0x80070005

    Recently after installing Office 2013 from an Office 365 web account, thru web based Outlook, I encountered the error code (0x80070005).

    We’re sorry, something went wrong and we can’t do this for you right now. Please try again later. (0x80070005).

    outlook-activation-error


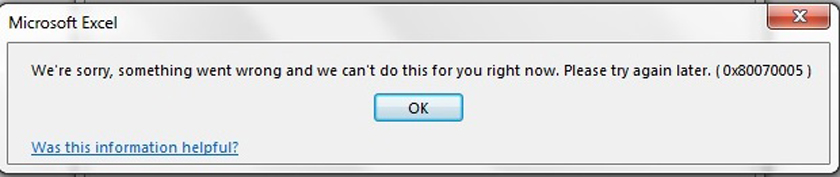
    Incredibly, trying again later didn’t help. “Was this information helpful?” Is the link under that error, and of course I did advise them that it wasn’t.

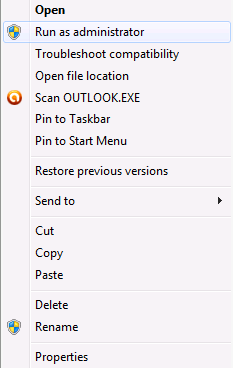
    After some research, it appears Microsoft requires admin access when running their activation software, which Office generally doesn’t run under. This will generally occur on  startup of any Office 2013 application after initial installation . So the pretty simple fix for this error was to run whichever Office product you first start after your installation is complete as an administrator.

    Right clicking on any Office product shortcut and then clicking on the Run as Administrator command will solve this problem straightaway.

    administrator

    Office shortcuts can be found in Start>All Programs>Microsoft Office. You may need to create a shortcut on your desktop first by dragging and dropping a copy of the shortcut from the Microsoft Office folder in the start menu. Be sure the icon has a little “Plus” sign on it before you let go of the mouse, or you will move the icon, much to the chagrin of the other users on this machine, if any.

    The Office program should start and will not show any error, and it will automatically register with Microsoft, if you have configured everything else properly. As both Office 365 and Office 2013 require you to have an email account and register Office tied to that, this must be done first.

    Mike at Westway PC


  • Office 2013 or Office 365 – Do I trust someone else with my data?

    Microsoft is trying to drag everyone into their cloud with Office 365.

    Microsoft’s latest Office suite offering, Office 365, comes pre-installed on most PCs you buy retail from now on. The question is, do you want to rent cloud-based software from Microsoft? Or do you want to buy a perpetual license for the Office suite software for your PC.

    The differences between Office 365 Home Premium and Office 2013 Full versions are minute, but the licensing is not. As of March of this year (2013), Microsoft changed the End User License Agreement (EULA) on the perpetual license of the Office 2013 Full Packaged Product Retail (FPP). Now the Office license is not tied to the machine it is first licensed and loaded on. Of course, this is the most expensive version of Office 2013 at over $400. But compare to the Office Home and Student version which excludes Outlook (unbelievably), Access, and Publisher. In my opinion, Outlook is without a doubt the best email client out there, so I recommend not buying Office 2013 Home and Student.

    The next step up is Office Home and Business, which does include Outlook, Word, Excel, PowerPoint, and OneNote. This can be obtained for around $150.00 or less, and it comes in a download form. This should be all any home user would need. If you are an Access database developer that works from home, you probably aren’t going to be reading this article. This comes with the caveat that it is locked to the machine you initially install it to. If your hard drive fails and you have to re-install Windows, you are going to run into problems re-installing. Of course, you should always have a full backup including a Windows Image, which SHOULD preclude this problem.

    Office 365 Home Premium comes with the latest versions of the Office software bundled. However, is that once you commit to using Office 365, you must continue paying the subscription fee or lose access to the software. At this time, it runs $10 a month, or $100 a year. That being said, it allows for installation on 5 machines with the same logon. It also includes 20gb of drive space on Skydrive. Since most people don’t have 5 machines they logon to, it doesn’t appear to be cost-effective to rent.

    Many home users are still on Office 2003 and are perfectly happy with that. Now, if you have several devices that can run Office, and trust your data with someone else, maybe Office 365 Home Premium is for you. Microsoft has also promised you get any upgrades that come out for no charge. But then they said the same thing about Vista Ultimate and it really never happened. BTW, Office 365 runs only on Windows 7 and up. Vista or XP is a no-go.

    In summation, you have a decision to make when you set up your shiny new computer. Do I want to rent Office 365 Home Premium and be locked into renting software from Microsoft? Or will a download of Office 2013 Home and Business using a traditional perpetual license work for me?


  • How to Setup Outlook 2010 Auto-Archive

    Outlook 2010 Auto Archive

    If you want to keep Outlook 2010 clean and running faster, one method is to set up the AutoArchive feature. Today we show you how to configure and manage the feature in Outlook 2010. Using AutoArchive allows you to manage space in your mailbox or on the email server by moving older items to another location on your hard drive.

    Enable and Configure Auto Archive

    In Outlook 2010, Auto Archive is not enabled by default. To turn it on:

    • Click on the File tab to access Backstage View, then click on Options.
    • The Outlook Options window opens then click on Advanced then the AutoArchive Settings button.
    • The AutoArchive window opens and you’ll notice everything is grayed out.
    • Check the box next to “Run AutoArchive every…”  Note: If you select the Permanently delete old items option, mails will not be archived.
    • Now you can choose the settings for how you want to manage the AutoArchive feature. Select how often you want it to run, prompt before the feature runs, where to move items, and other actions you want to happen during the process.
    • After you’ve made your selections click OK.

    Manually Configure Individual Folders

    For more control over individual folders that are archived, try this:

    • Right-click on the folder and click on Properties.
    • Click on the AutoArchive tab and choose the settings you want to change for that folder. For instance, you might not want to archive a certain folder or move archived data to a specific folder.
    • If you want to manually archive and backup an item, click on the File tab, Cleanup Tools, then Archive.
    • Click the radio button next to Archive this folder and all subfolders.
    • Select the folder you want to archive. In this example we want to archive this folder to a specific location of its own.
    • The .pst files are saved in your documents folder and if you need to access them at a later time you can.

    After you’ve setup AutoArchive you can find items in the archived files. In the Navigation Pane expand the Archives folder in the list. You can then view and access your messages. You can also access them by clicking the File tab \ Open then Open Outlook Data File.  Then you can browse to the archived file you want to open.

    Archiving old emails is a good way to help keep a nice clean mailbox. It helps speed up your Outlook experience and saves space on the email server. The other nice thing is you can configure your email archives and specific folders to meet your email needs.


  • Can’t send mail with AT&T Internet service

    AT&T Internet Service Provider Email Problems

    AT&T has restricted outgoing email by directing all SMTP traffic to their servers only. This is to reduce spam, but it makes it very hard to use Outlook or any other mail program to send email if you have Uverse or DSL thru AT&T. There is a way around this though. Most SMTP servers also accept mail on port 587. Try changing the outgoing mail to port 587. You may get lucky if your email host accepts email on that port. Don’t forget to tell Outlook to use the same name and password as your incoming (POP) server.